How to Make Detailed Rose Nail Art Design | VIDEO Tutorial
How to Make Detailed Rose Nail Art Design | VIDEO Tutorial
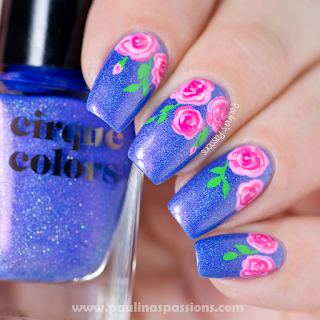
Hi guys. I hope everyone is doing great and that you guys had a great start of the week. If you follow my blog for a while, you probably know how I feel about rose nail art designs! For those of you who don't know, I will simply put it this way, I am obsessed with them! There was a period of time when I was frequently making roses, but lately I stopped for a while to try some different techniques. I also didn't want to be too repetitive and maybe boring? However, I've noticed that whenever I post floral nail art designs, you guys seem to love them. So in today's post I have another rose nail art design for you with a video tutorial.
The beautiful blue base of my nail art is Cirque Colors Vaporwave . This nail polish comes from the Kawaii collection and I've reviewed it HERE . It's absolutely stunning and gives a nice contrast for the pink roses.
For the roses itself I used 4 different shades of pink. Make sure the pinks come from the same 'pink family'. Meaning they should have the same tone, but different shades (in my case I chose 4 shades of pink with a cool undertone). You should try to avoid mixing peachy pinks with the ones with more violet undertone or it's going to look a bit messy. Hopefully this makes sense.
I started with China Glaze Bottoms Up as a base for the flowers and then I used Serendipity Summer Sunnies , Zoya Winnie and Zoya Byrdie for the details. Layer the colors to create a beautiful depth to the flowers. The darkest color of pink should be only applied in the middle. Paint the leaves and tiny rose buds (those are my favorite! Who noticed them? Comment below!).
I hope you guys are going to forgive ma an additional watermark on my photos. I've noticed an increased number of thefts on my photos in the recent months and I had to do something to protect my copyright. I hope it's not too 'on your face' change and that it will not affect the aesthetics.
Let me know what you guys think of my more detailed rose nail art design and tell me how you liked the video.
I hope you have a great day.
Some of the products in this post were provided for an honest review.
The post How to Make Detailed Rose Nail Art Design | VIDEO Tutorial appeared first on .
http://paulinaspassions.com/detailed-rose-nail-art-design-video/


